

Yet another hobby has emerged from inside quarantine: do-it-yourself tattoos. Over the last however many days spent inside, I’ve seen no fewer than three people showing off their new “ink” on their Instagram accounts. Meanwhile, on TikTok, too, people have begun filming themselves testing (and reviewing) various kits they’ve found on Amazon and elsewhere. The trouble is: Tattooing oneself isn’t quite like picking up quilting or origami. And it certainly shouldn’t be done on a whim with things found laying around the house.
“Never ever use stuff you have at home,” says Austin-based tattoo artist Jack Ervin of Bad Bad Tattoo. “Sewing needles, hand soap, and pen ink are iconic DIY-tattoo implements, and I could never condone tattooing yourself with any of them. Using improvised equipment will hurt more, and the tattoo will age more poorly than a homemade tattoo created with the proper tools.” It’s equally important to keep your workspace meticulously clean. “When you’re tattooing yourself, you have to treat everything like it’s contaminated,” says Avery Osajima, a stick-and-poke tattoo artist based in Seattle. But with careful sanitation practices and the right tools, tattooing oneself is, in fact, fine, and is how many tattoo artists start out. Below, everything you’ll need, from station setup pieces to the very best ointment for after.
Station materials

Before breaking out the ink and needles, you’ll need to set up your station. While it doesn’t need to be as elaborate as the setup a tattoo artist might have, there are a few necessary essentials, like a metal tray, which should be used to store the materials you’ll be working with. “You need to work on nonporous surfaces that you can easily disinfect,” says Osajima, who also cautions against tattooing yourself on any surfaces that can’t be thoroughly disinfected first, like on a carpeted floor or couch.

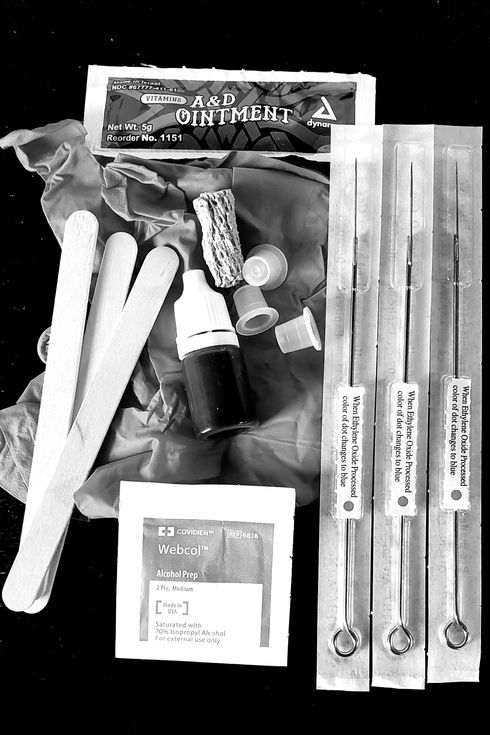
Speaking of disinfectant, not any random wipe or spray you have at home will work. You’ll need one that kills blood-borne pathogens, like MadaCide, a hospital-grade option that Osajima uses. “That stuff can kill hepatitis C, and HIV, tuberculosis,” she says. You’ll need to disinfect everything fairly constantly: the tray, the surface you’re working on, where you’re sitting.”


Almost every tattoo artist we spoke to mentioned using green soap, a water-soluble vegetable-oil-and glycerin-based soap used before and after tattooing, to cleanse and shave the area and to clean up the tattoo once you’re done. Green soap is ultraconcentrated so you’ll need to dilute it a bit with distilled water (distilled water lacks the trace minerals and microorganisms that can be found in tap water, and which can lead to infection).

“Definitely, definitely wear gloves,” says Julissa Rodriguez, a tattoo artist based in New York. You’ll need to keep a few pairs of gloves on hand while tattooing: one pair to wear while sanitizing your station, and then another to put on while laying down your tools. These are from tattoo supply company Coalition Tattoo Company, which Osajima uses to buy all of her supplies.

Both Osajima and Samantha “Cake” Robles of Tattoos by Cake say that tongue depressors are a must-have for any tattoo station. They’re used in parlors to spread ointment on the skin. The ointment lubricates and moisturizes the skin, which keeps ink from spreading everywhere once you start tattooing. “It really makes a big difference,” Osajima says. “Especially with stick and pokes.”

As for which ointment to use: Both Osajima and New York–based tattoo artist Sanyu Nicolas like Hustle Butter, which can also be used for aftercare. It has an oily consistency that keeps the ink from sliding around.
Tattoo materials

Of the five experts we spoke with, four recommended using the slower, simpler stick-and-poke method (in which you dip your needle in a cupful of ink, then press the needle into the skin to create an image or word out of individual dots). A tattoo machine has a motor and requires you to be extremely intentional about speed and how much pressure you’re putting on the needle (too much force could lead to a “blown out” tattoo, and the potential to scar your skin). Osajima particularly likes the relatively thin Tight 5 needle from Black Claw, which she calls a good, standard starting needle, and which she herself uses for the majority of her line work. [A note: Needles cannot be reused. You must use a different needle for every tattoo. To dispose of needles, you have to use a special sharps container — this one from OakRidge, is small, easy to store, and designed for home use.]

For extra-tiny tattoos, she likes to reach for the Hella Fine 5 Liner needle. And if she needs something even smaller she’ll reach for the Hella Fine 7, which produces even thinner lines.

To make holding the needle more comfortable during the process, Osajima recommends wrapping it in self-cohesive tape. “I use the two-inches-thick one,” she says.
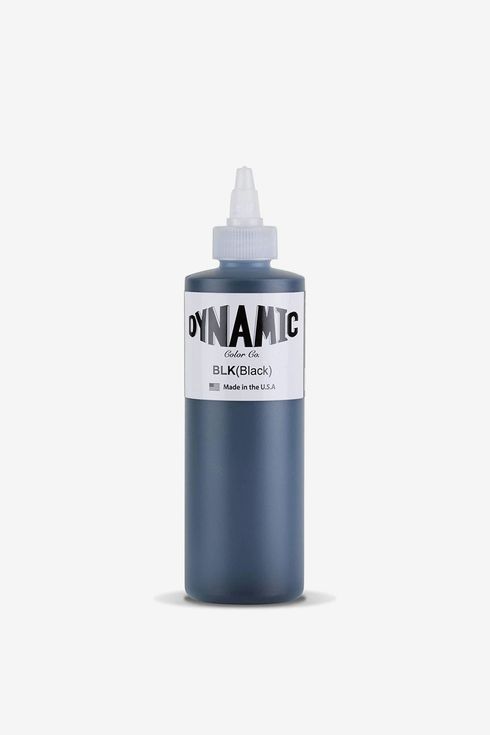
Three of our experts name-checked Dynamic as their ink of choice — it’s affordable, they say, and performs well. “It’s one of the oldest and most popular brands that tattoo artists use,” says Robles. Osajima agrees: “It creates a nice, dark, solid line,” she says, “and I like the consistency. With hand-poke tattoos, if the ink is too thick it can get globby and obscure what you’re trying to do.”
If you’d rather not invest in individual tattoo materials. Rodriguez recommends this ready-made kit from Pick and Poke Tattoo, which comes with three needles, black ink, an alcohol pad, gloves, stretch wrap, tattoo ointment, and sticks, along with an instructional guide on how to safely tattoo.
Design materials

While what design you choose is entirely up to you, the artists we spoke to recommend keeping it simple and easy to execute. There are two ways to create your tattoo design: stenciling and free drawing. Stenciling requires a few more steps than free drawing but creates a precise guide for you to follow, and allows you to tattoo just about any image you want. Once you settle on an image you’ll need to print it out and then trace it onto the top sheet of the stencil paper, which will transfer the design onto the stencil below.
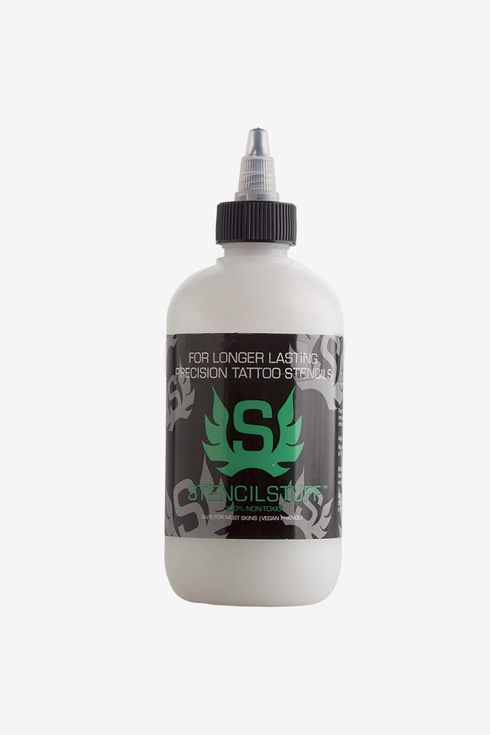
For ensuring the tattoo stencil stays put throughout the tattoo process, Robles and Osajima suggested first shaving the area clean with a sharp razor, then applying Stencil Stuff, a solution designed by tattoo artists that helps the stencil stay in place. Apply a few dots in the area you’re tattooing, then rub it into the skin until it creates a sort of clear, tacky film. Then, press your stencil down and wait a few minutes before peeling it away.

If you’d rather draw your tattoo freehand, or don’t have access to stencil paper, you can draw your tattoo with a surgical pen instead. (This will stay on your skin much better than a regular marker or ballpoint.) She likes this one from Viscot in particular — it’s double-sided with a thicker and thinner point. “The longer it has to dry, the better it sticks,” Osajima says of the pen. “If you make a mistake while drawing I’d recommend wiping it off with rubbing alcohol.” A note: All of the drawing should be done prior to tattooing — pens shouldn’t be used on broken skin.
Aftercare

Once you’ve completed the tattoo, aftercare is key. After completing the tattoo wash it immediately with Green Soap to get rid of the excess ink; then apply a thin layer of ointment on top. (Robles likes A+D ointment, but Hustle Butter was name-checked several times as well.) Then wrap the tattoo in plastic wrap and let it sit for at least three hours. After that, Robles recommends keeping it covered with ointment for three to five days while it heals.
The Strategist is designed to surface the most useful, expert recommendations for things to buy across the vast e-commerce landscape. Some of our latest conquests include the best acne treatments, rolling luggage, pillows for side sleepers, natural anxiety remedies, and bath towels. We update links when possible, but note that deals can expire and all prices are subject to change.


